LOCAS Portal User Guide
Your step-by-step guide to the Local Content Assessment System
Procurement
The Procurement module is where you manage your company's purchasing activities and local content compliance. Click the Procurement tile on the dashboard to get started.
Core vs Non-Core: Why It Matters
Every procurement item is classified as either Core or Non-Core. This determines the rules:
Core (First Schedule)
Goods and services that may be sourced from local or non-local suppliers, subject to progressive local content thresholds and the 15% Margin of Preference.
Non-Core (Second Schedule)
100% reserved for local companies. You cannot award a non-core contract to a non-local supplier. No exceptions.
Progressive Local Content Thresholds (Core Items)
| Timeline (from Jan 2026) | Minimum Local Content |
|---|---|
| 6 months | 20% |
| 12 months | 25% |
| 24 months | 35% |
| 60 months onwards | 40% (minimum thereafter) |
How to Tell
When entering a tender, you select the schedule type: Core Goods, Core Services, Non-Core Goods, or Non-Core Services. The system enforces the rules automatically.
Procurement Dashboard
The dashboard gives you a bird's-eye view of all procurement activities:

Procurement Plans
Annual planning documents outlining your intended purchases.
Tender / Contracts
Declare individual tenders and contracts as they are awarded.
Tender Declarations
Submit quarterly Form I and Form II local content disclosures.
Procurement Summaries
Auto-generated quarterly summaries — just review and submit.
Maker-Checker Approval (All Procurement)
All procurement submissions follow a maker-checker workflow to ensure accuracy and accountability:
| Step | Role | Action |
|---|---|---|
| 1. Create | Reporting Officer | Enters data, uploads documents, saves as Draft |
| 2. Submit for Review | Reporting Officer | Clicks "Submit for Review" → status becomes Pending Review |
| 3. Review | Company Admin | Reviews data. Two options: |
| Approve → status becomes Submitted (sent to Ministry) | ||
| Request Revision → returns to Draft with notes (reporter can edit and resubmit) |
No Terminal Rejection
There is no "rejected" state. If a submission needs changes, it is returned to Draft so the reporter can correct and resubmit. This is a revision loop, not a rejection.
Procurement Plans
Upload your annual procurement plan before the start of each fiscal year. This plan outlines what your company intends to purchase and is the foundation for tracking compliance.

How to Upload a Procurement Plan
Select the Fiscal Year
Choose which year the plan covers.
Upload the Plan Document
Attach your procurement plan file (PDF or Excel).
Add Line Items
For each item in your plan, enter:
| Field | Description |
|---|---|
| UNSPSC Code | Standard goods/services classification code |
| Description | What you intend to purchase |
| Category | Goods or Services |
| Schedule Type | Core Goods, Core Services, Non-Core Goods, or Non-Core Services |
| Quantity | Planned number of units |
| Unit Price (ZMW) | Estimated cost per unit |
| Estimated Value | Auto-calculated: Quantity × Unit Price |
| Procurement Method | ICB (International Competitive Bidding), NCB (National Competitive Bidding), or Direct Contracting |
Submit
Plans are auto-approved on creation. No Ministry approval step is needed for the plan itself.
Selection Criteria Wizard — Classifying Items
Not sure whether an item is Core or Non-Core? The system includes a built-in Selection Criteria Wizard that asks you a series of Yes/No questions and automatically determines the correct classification based on SI 2025 rules.
Why Classification Matters
Every item in your procurement plan must have a classification (Core Good, Core Service, Non-Core Good, or Non-Core Service). Plans with unclassified items will be reset to draft and associated tenders invalidated. Your company may also be flagged as non-compliant.
Where to Find the Wizard
The criteria wizard is available in two places:
Procurement Dashboard
Click the "Core/Non-Core Criteria Checker" tile to classify an item before adding it to a plan. Useful for checking individual items quickly.
Plan Form (Per Line)
When creating or editing a plan via the form, each line with an unspecified schedule shows a "Use Criteria" button. Click it to classify that specific item in-line.
How It Works (Step by Step)
Choose a Criteria Configuration
Select the criteria set to use (the system default is pre-selected). Different configurations may exist for goods vs services or for specific industries.
Answer the Yes/No Questions
Each question asks about the nature of the item being procured. Answer Yes or No for every visible question. Some questions may appear or disappear based on your earlier answers — this is normal (dependency rules).
Tip
Read each question carefully. The wizard evaluates your answers against weighted criteria defined in SI 2025 to determine whether the item should be classified as Core or Non-Core.
View the Result
After answering all questions, click "Evaluate". The system calculates a score and shows the classification:
| Result | Meaning |
|---|---|
| Core | The item falls under the First Schedule — subject to progressive local content thresholds and 15% Margin of Preference. |
| Non-Core | The item falls under the Second Schedule — 100% reserved for local companies. |
| Review | The result is borderline. You should consult the Ministry or re-evaluate. |
Select the Schedule Tag
After the classification is determined, the wizard shows the available schedule tags (e.g., 1000 — Core Goods, 3000 — Core Services, 4000 — Non-Core Services). Select the one that best matches your item. This sets the Class and Class Code on the plan line automatically.
Using the Wizard on the Plan Form
When creating or editing a procurement plan via the Form method:
- Add a new line item and fill in the product name, category (Goods/Services), quantity, etc.
- Leave the Schedule Item dropdown as "Select schedule item…" (unspecified).
- A Use Criteria button appears next to the line.
- Click it — a modal window opens with the criteria questions.
- Answer all questions and click "Evaluate".
- Select the appropriate schedule tag from the result.
- Click "Apply" — the schedule item, class, and class code are filled in automatically on that line.
- Repeat for any other unclassified lines.
Items Not in the SI 2025 Schedule
If your item does not exactly match an entry in the First or Second Schedule, use the criteria wizard to determine its classification. The wizard evaluates characteristics of the item (e.g., local availability, technical complexity) rather than looking for an exact name match. Once classified, select the closest matching schedule tag from the result list. If you are still unsure, consult the Ministry of Mines for guidance.
Bulk Upload Users
If you uploaded your plan via Excel and some items were not classified, you can fix them without re-uploading. Go to your plan, click Quick Edit, and use the criteria wizard on each unclassified line. Alternatively, re-import an updated file with the correct Class Code column filled in (1000, 2000, 3000, or 4000).
Version Control & Editing
- You can update a submitted plan at any time using Form Edit or Bulk Upload.
- Each upload creates a new version automatically (e.g., V1, V2, V3).
- When a new version is created, the previous version is automatically cancelled.
- All previous versions are preserved for your records — you can view the full history.
Late Submission
Plans uploaded after the fiscal year starts are flagged as late and may result in an auto-generated penalty.
Tender Declarations
A Tender Declaration is a quarterly register of all tenders your company has put up or plans to advertise. There is one declaration per quarter.

Select the Quarter
Choose which quarter this declaration covers. All tender dates must fall within this period.
Add Tender Lines
For each tender, provide: Tender Number, Tender Date, Description, Procurement Method, and Estimated Amount (ZMW). You can optionally add a schedule breakdown (Core Goods, Non-Core Services, etc.) with quantities and values.
Link to Plan Lines (Optional)
Connect each declaration line to items from your approved procurement plan. This creates a complete audit trail from plan → declaration → tender.
Submit for Review
Click "Submit for Review". A Company Administrator must approve before it goes to the Ministry (maker-checker).
Auto-Linking from Tenders
When you upload a tender result for a tender that is not in any declaration, the system automatically creates a declaration line for it in the current quarter's declaration. You don't need to declare it separately.
Late Submissions
Declarations submitted after the quarter deadline are flagged as late and may attract a penalty.
Tenders & Contracts
Click Tender/Contract Management on the Procurement Dashboard. This is where you report awarded tenders for compliance monitoring.
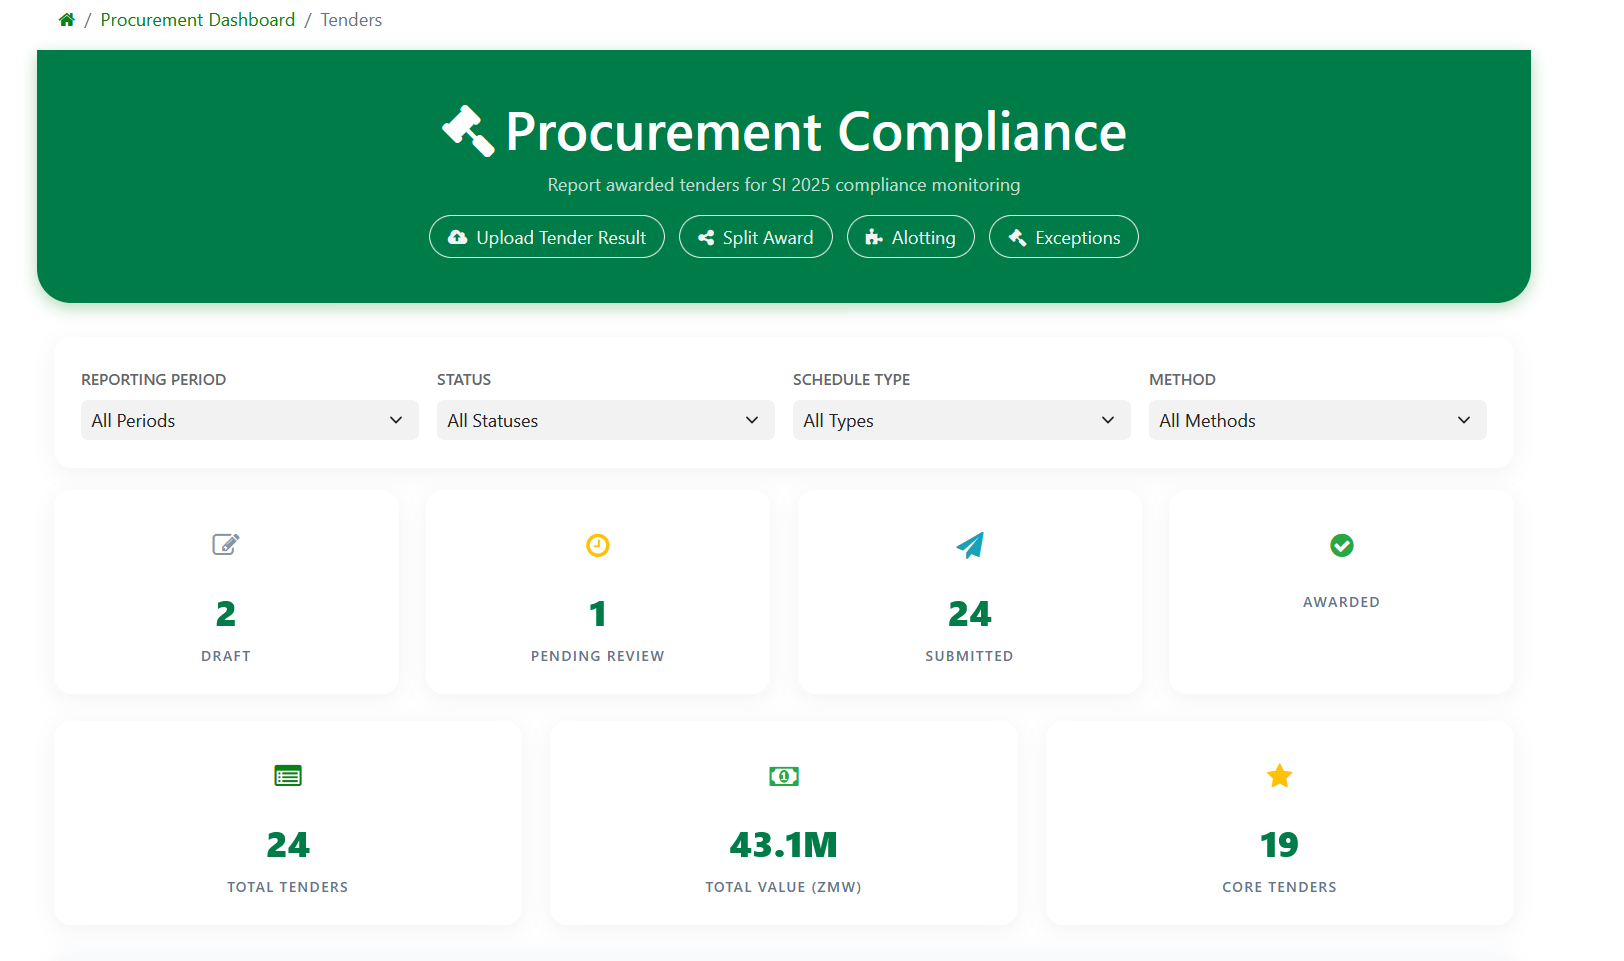
Status Tiles
Draft
Started but not submitted. Still editable.
Pending Review
Submitted by reporter, waiting for admin approval.
Submitted
Approved and sent to the Ministry.
Awarded
Fully processed and awarded.
Filters
Use dropdowns to narrow your list by Reporting Period, Status, Schedule Type (Core/Non-Core Goods/Services), or Method (ICB, NCB, Direct Contracting).
Action Buttons
| Button | What It Does |
|---|---|
| Upload Tender Result | Report a new awarded tender — the main way to declare procurements |
| Split Award | Award different parts of one tender to different local suppliers |
| Lot Splitting | Re-allocate when a local supplier fails to deliver |
| Exceptions | Record an exception when non-local sourcing is needed |
Upload Tender Result
This is the main way to report procurements. You can report tenders in two ways:
Single Entry
Enter one tender at a time using a step-by-step form.
Bulk Upload
Upload multiple tenders from an Excel template.
Single Entry — Step by Step
Link to Declaration (Optional)
Search for a tender from your declaration. If found, details are pre-filled. If the tender is not in any declaration, the system will automatically create a declaration line when you save.
Tender Information
Enter the reference, procurement method (ICB/NCB/Direct Contracting), description, award date, and total value.
Schedule Items (Line Items)
Add one or more schedule items — e.g., "Core Goods — 500 units at K 2,000 each". For each line, select the schedule type, enter quantity, unit of measure, and value. The system auto-calculates the total contract value from all lines.
Add Bidder Suppliers
Search and add all suppliers who bid on this tender. Each supplier shows a Local or Non-local tag next to their name.
Enter Bid Details
For each bidder, enter their bid amount and quotation reference. The system auto-calculates the 15% Margin of Preference for Core items.
Understanding the 15% Margin of Preference (MoP)
For Core items, the system discounts local bids by 15% when comparing against non-local bids:
- Evaluated Local Price = Local Bid − 15%
- If the evaluated local price is equal to or less than the non-local bid → the local supplier must win
- If the evaluated local price is higher → you may award to the non-local supplier
Example: Local bids K 100,000. Evaluated = K 85,000. Non-local bids K 90,000. Since K 85,000 ≤ K 90,000, the local supplier must be awarded the tender.
The system calculates this automatically and flags any tender where a non-local supplier was awarded despite a local supplier qualifying under the MoP.
Select Winner
Choose the winning supplier using the radio button. You can also mark the tender as a direct OEM procurement if applicable (lot splitting rules don't apply to OEM purchases under Regulation 4(4)).
Supporting Documents
Upload award letters, evaluation reports, or OEM certificates. Optionally add contract references (PO number, delivery note, GRN, invoice).
Submit
Click "Submit" to save as draft, or "Submit for Review" to send for Company Admin approval. When approved, the tender value flows into your quarterly procurement summary.
Editing a Tender
While a tender is in Draft status, you can click "Edit" to modify any field. The edit page shows:
- Basic information (reference, method, description, dates)
- OEM exemption toggle (with manufacturer details if enabled)
- Schedule items table (add/remove lines)
- Bidders and their bid amounts (add new bidders, change winner)
Bulk Upload
For multiple tenders at once: download the template, fill one tender per row, and upload. If any row has errors, the system shows which rows failed and why.
How Tenders Update Your Plan
When a tender is saved, the system automatically links it to your procurement plan for the current fiscal year. If the tender matches a plan line item, they are connected. If not, the system tracks it as an unplanned procurement for compliance purposes.
Split Awards
A Split Award lets you divide a single tender among multiple local suppliers from the outset. This promotes local participation and reduces concentration risk. There are two types:
Split by Item
One tender with multiple line items, each awarded to a different local supplier based on their strength.
Create Split Award
Go to Procurement Dashboard → Split Award and click "New Split Award". Select "By Item" as the split type.
Enter RFQ Details
Enter the RFQ reference number and description of what is being procured.
Add Line Items
Add the items being procured. For each line: schedule item, quantity, unit of measure, and unit price.
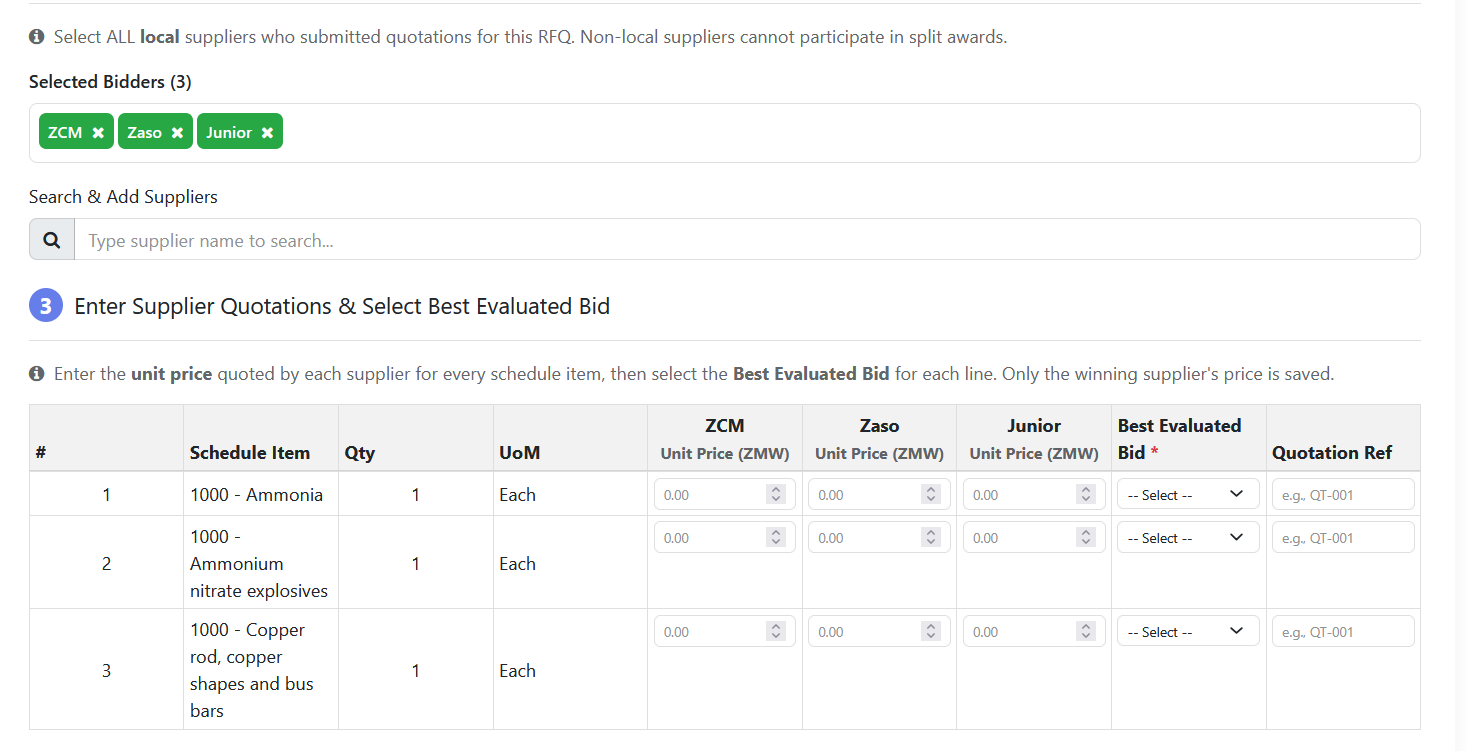
Add Suppliers & Enter Bids
Add the suppliers who quoted. The form shows a matrix of items × suppliers. Enter each supplier's unit price per item. The system highlights the lowest bid per item.
Review Allotting
The system auto-selects the best-evaluated bid per line item (applying the 15% MoP for Core items). Review the proposed allocation — which supplier gets which item.
Submit for Review
Click "Submit for Review". A Company Admin reviews and approves. Once approved, the system generates separate contracts (tenders) for each winning supplier.
Example
A K 5M consumables tender: rollers to Supplier A (lowest bid), grinding media to Supplier B, lubricants to Supplier C, safety wear to Supplier D. Each supplier delivers a different product.
Split by Quantity
One item with a large quantity divided among multiple local suppliers. Each gets a portion of the same product.
Create Split Award
Select "By Quantity" as the split type.
Enter the Item & Total Quantity
Describe what is being procured and the total quantity needed (e.g., 10,000 tonnes of cement).
Allocate to Suppliers
Add the local suppliers and enter how much quantity each one will deliver. The total must equal the original quantity.
Submit for Review & Approval
Admin approves → system generates one contract per supplier with their allocated quantity.
Example
10,000 tonnes of cement: 5,000 to Supplier A, 3,000 to Supplier B, 2,000 to Supplier C. All deliver the same product — the quantity is split so no single supplier is overwhelmed.
Editing Split Awards
While in Draft status, click "Edit" on the split award detail page. The edit page shows:
- A read-only summary at the top (reference, type, supplier count)
- An editable table of line items with supplier allocations
- An "Add New Line" form for additional items
- Delete buttons to remove lines
- Document management (delete existing, upload new)
- Buttons: "Save Draft" (saves without submitting) or "Save & Resubmit" (saves + sends back for review)
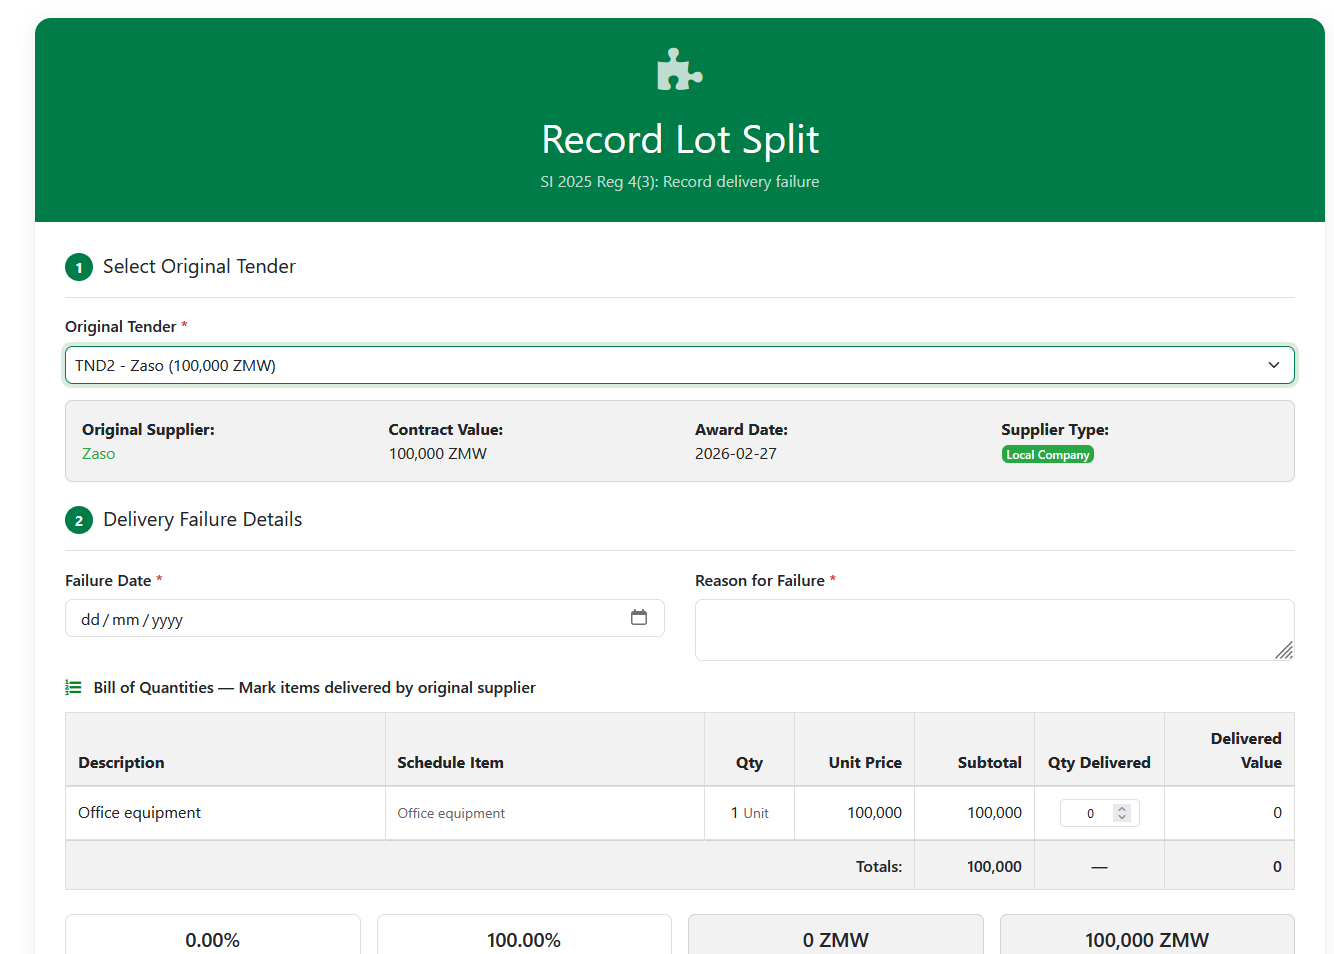
Lot Splitting (Delivery Failure)
SI 2025 Regulation 4(3) allows you to "split" a lot when a local supplier fails to deliver. The remaining work must be re-allocated to other local suppliers first.
When to Use
Use this only when a contracted local supplier has failed to deliver (fully or partially). Do not use for initial tender planning — use Split Awards instead.
Select the Tender
Go to Procurement Dashboard → Lot Splitting and click "New Lot Split". Choose the tender where the supplier failed to deliver.
Record Failure Details
Enter the failure date and reason (e.g., "Capacity constraints", "Quality issues", "Financial difficulties").
Mark What Was Delivered
Enter the delivery percentage — what portion of the contract the original supplier successfully delivered (e.g., 40%). If nothing was delivered, enter 0%.
Allocate the Remainder
The remaining undelivered portion must be re-allocated following this sequential priority:
- Other local suppliers first — allocate as much as possible to Zambian-owned or citizen-empowered companies
- Non-local suppliers only if locals cannot fulfil — this triggers an exception and auto-generates a penalty
For each supplier allocation, enter the supplier, allocated value, and justification.
Submit for Review
Click "Submit for Review". A Company Admin reviews the lot split:
- Approve → lot split is finalised. If non-local allocation exists, an auto-penalty is generated (category: contract subdivision).
- Request Revision → returns to Draft with notes. The reporter can edit and resubmit.
No Ministry Approval Needed
Lot splitting is a reporting tool — the mine records what happened and the system flags non-compliance. The Ministry is notified but does not need to approve the lot split.
Exceptions (Non-Local Allocation)
SI 2025 Regulation 4(5) allows you to record an exception when local capacity is insufficient and a non-local supplier must be used. The mine applies the exception and reports it to the Ministry — no Ministry approval is required.
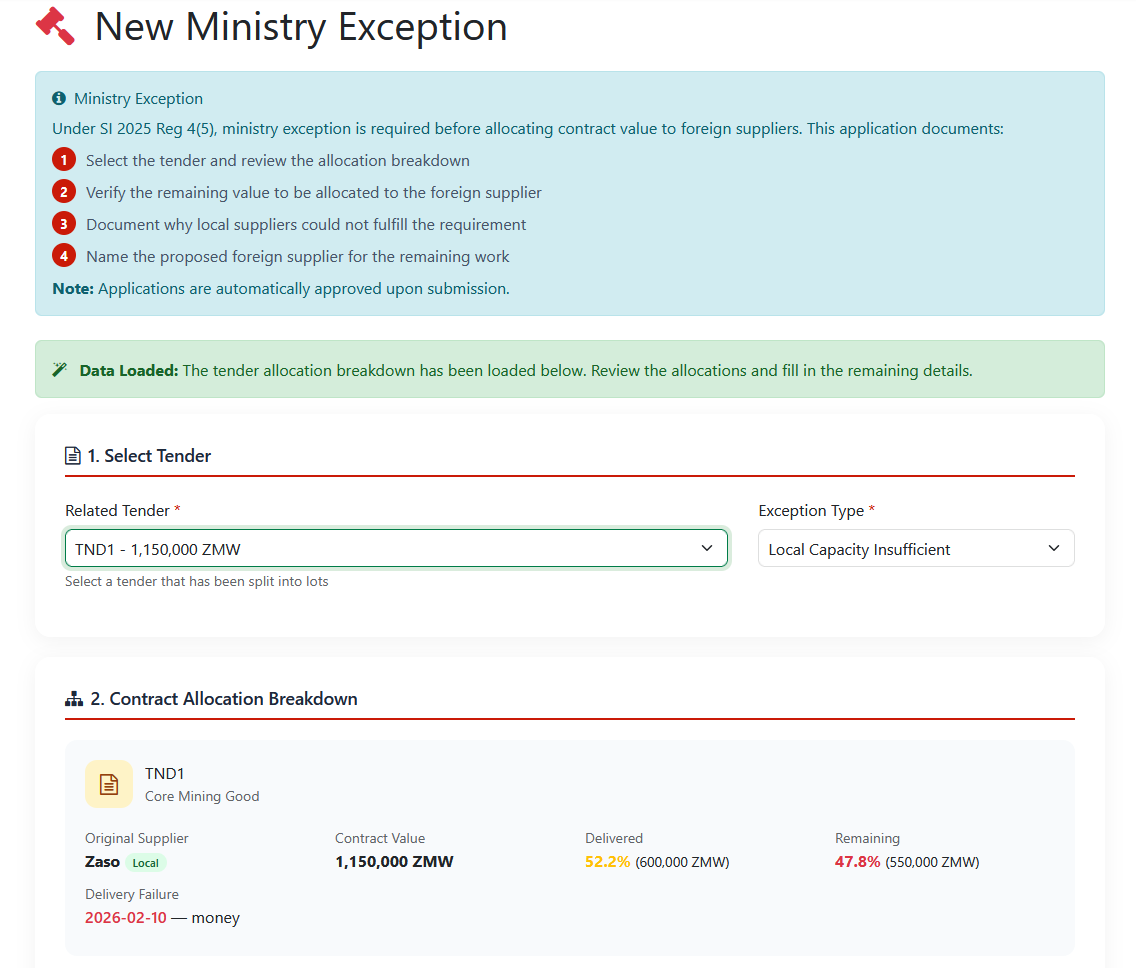
Creating an Exception
Select the Tender
Go to Procurement Dashboard → Exceptions and click "New Exception". Choose the tender or lot split that requires non-local sourcing.
Choose Exception Type
Select the reason: Local Capacity Insufficient, Technical Requirement, Emergency/Urgent, or Other (provide explanation).
Add Non-Local Supplier Allocations
For each non-local supplier allocation, enter the supplier, item description, quantity, unit price, and a justification explaining why this supplier was chosen.
Document Capacity Assessment
Provide a capacity assessment summary — confirm that you assessed whether local suppliers could meet the requirement. Add a technical justification explaining why they could not.
Log Supplier Contact Records
Record which local suppliers you contacted, when, how (email/phone/meeting), whether they responded, and why they declined or could not deliver. You must have contacted at least 3 local suppliers.
Upload Supporting Documents
Attach any supporting evidence: quotation requests, supplier responses, capacity reports, technical specifications.
Submit for Review
Click "Submit". A Company Admin reviews the exception:
- Approve → exception is finalised and reported to the Ministry
- Request Revision → returns to Draft with a reason. You see the revision reason on the edit page and can make corrections and resubmit.
Editing an Exception
While in Draft status (including after a revision request), click "Edit Exception" on the detail page. The edit page provides:
- A read-only summary at the top (tender, company, submission date)
- If revision was requested, a highlighted alert showing the revision reason
- Editable exception type
- Inline editable table of supplier allocations (change supplier, qty, price, justification; add new rows; delete rows)
- Editable capacity assessment and technical justification
- Supplier contact records table
- Document management (delete existing files, upload new ones)
- Buttons: "Save Draft" (saves without submitting) or "Save & Resubmit" (saves and sends back for admin review)
Key Points About Exceptions
- This is a reporting tool — the mine applies the exception and reports to the Ministry. No Ministry approval step is needed.
- There is no terminal "rejected" state. If the admin requests revision, the exception returns to Draft for editing.
- All foreign items must be fully allocated to suppliers before the exception can be submitted.